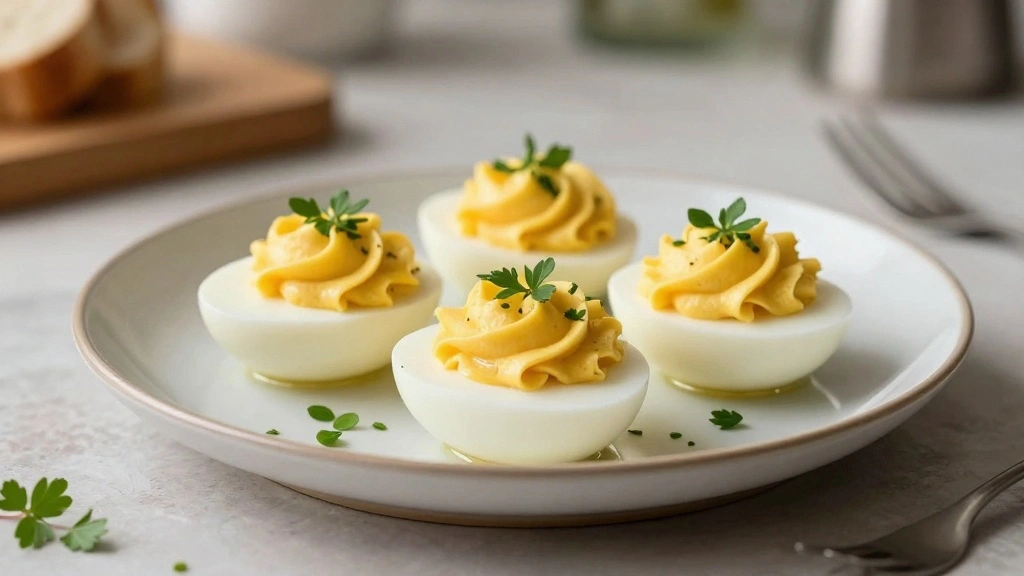
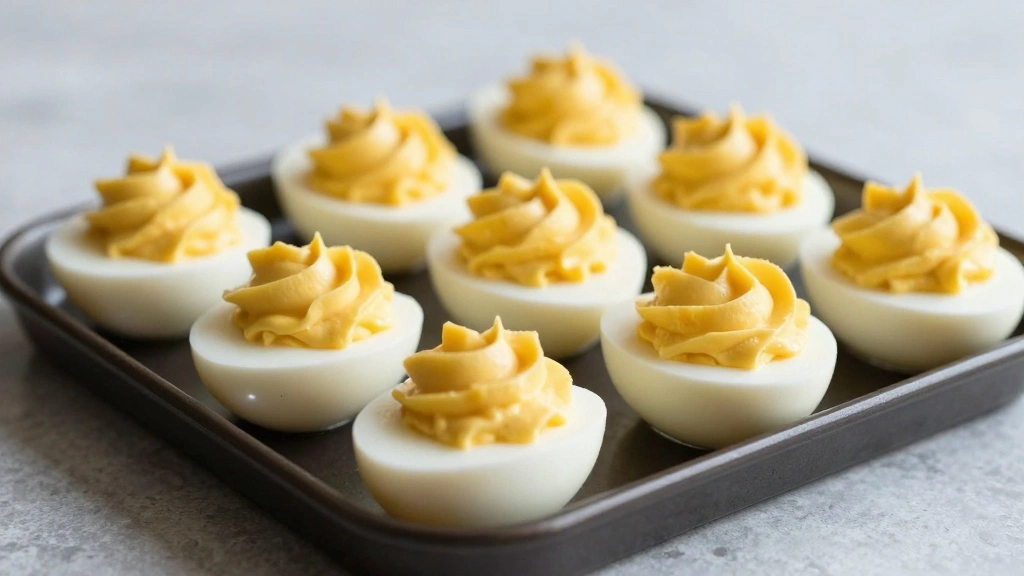
The delightful combination of hard-boiled eggs and turkey creates a high-protein snack that is both satisfying and nutritious.
With a creamy and flavorful filling, these Turkey Deviled Eggs are perfect for any occasion, from picnics to holiday gatherings.
My personal connection to this recipe stems from my childhood, where deviled eggs were a staple at family gatherings.
The addition of turkey not only enhances the flavor but also adds a unique twist that makes this dish stand out.
Whether you’re a fan of traditional deviled eggs or looking to try something new, this recipe offers a delicious experience.
With straightforward preparation and impressive results, these Turkey Deviled Eggs are sure to become a favorite.
The History and Cultural Significance
• Turkey Deviled Eggs traces its origins to ancient Rome, where it was originally created by chefs who prepared boiled eggs with spicy sauces.
• The dish evolved over decades as various cultures added their own ingredients, eventually becoming the beloved version we know today with mayonnaise and mustard.
• In American culture, this dish traditionally appears at Thanksgiving and Easter celebrations, symbolizing abundance and sharing.
• While many variations exist across different regions, the authentic version maintains the creamy filling and a sprinkle of paprika that sets it apart from imitations.
Recipe Overview
Nutritional Information
Essential Equipment Guide
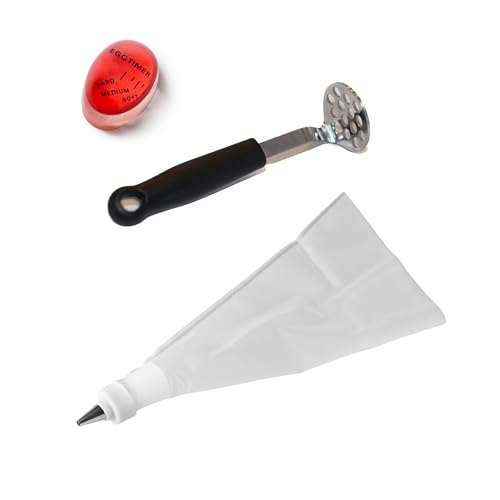
Egg Cooker: An egg cooker is essential for achieving perfectly boiled eggs with consistent results, ensuring the yolks are fully set without overcooking. If you don’t have an egg cooker, a pot with a lid can work as an alternative. Look for one with a timer for added convenience.
Piping Bag: A piping bag is important for creating clean and professional-looking deviled egg filling. If unavailable, a plastic sandwich bag with a cut corner can serve as an alternative. Choose a bag with a sturdy tip for better control.
Mixing Bowl: A mixing bowl is necessary for combining the filling ingredients smoothly. A bowl with a non-slip base ensures stability while mixing. Stainless steel or glass bowls are excellent choices for their durability and ease of cleaning.
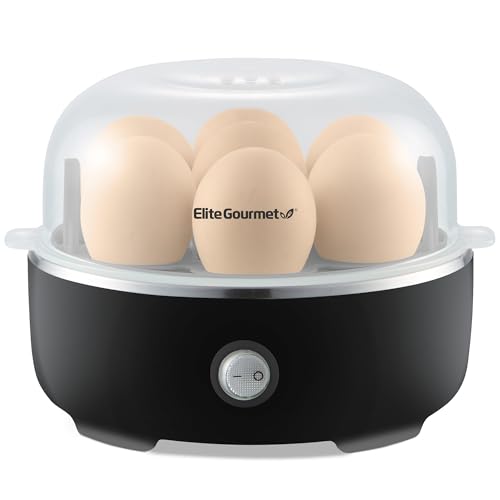
SEVEN EGG CAPACITY: Cook up to 7 eggs in soft, medium, or hard-boiled firmness, while saving time and water. Eggs come out consistently perfect, shell is easy to peel, and cleanup is simple!

Premium Nontoxic Heat Resistant - 100% bpa Free, no BPF and made of durable Food-Safe and Non-toxic Polyresin. The egg timer complies with the most rigorous safety standards and completely safe for kids and adults.

RAPID BOILING: Fill measuring cup with water to desired doneness, press the power button and within minutes your eggs will be "Egg-Celent!" Fun and simple to use for family members of all ages! The built-in timer, buzzer and auto-shut off gets it right every time! Faster than conventional stovetop methods!
Ingredients

Rodelle Gourmet turkey brine is made with the finest, wholesome ingredients to elevate your holiday turkey from good to great Brining locks in the moisture in the turkey, and...
For the Base
|
| Amount | Ingredient | Notes |
|---|---|---|
| 12 large | eggs | hard-boiled |
| 1 cup | cooked turkey breast | finely chopped |
For the Filling
| Amount | Ingredient | Notes |
|---|---|---|
| 1/2 cup | mayonnaise | adds creaminess |
| 1 tablespoon | Dijon mustard | for tangy flavor |
| 1 tablespoon | apple cider vinegar | adds acidity |
Seasonings
| Amount | Ingredient | Notes |
|---|---|---|
| 1 teaspoon | salt | enhances flavor |
| 1/2 teaspoon | black pepper | adds warmth |
| 1 teaspoon | paprika | for garnish and flavor |
Preparation Methods
Hard-Boiling Eggs: To achieve perfectly hard-boiled eggs, place them in a single layer in a pot and cover with cold water. Bring to a boil, then cover, remove from heat, and let sit for 10-12 minutes. Transfer to an ice bath to stop cooking and make peeling easier.
Chopping Turkey: Finely chopping turkey breast ensures even distribution in the filling. Use a sharp knife and chop into small, uniform pieces for the best texture. Avoid large chunks as they may not blend well.
Piping the Filling: Use a piping bag to fill the egg whites smoothly. Hold the bag at a 45-degree angle and apply consistent pressure to achieve a neat finish. Practice on a plate first if you're new to piping.
Step 1: Prepare Ingredients

Gather all your ingredients and equipment.
Ensure the eggs are fully boiled and cooled.
Chop the turkey breast into fine pieces.
Set aside eggs, turkey, and all filling ingredients.
Step 2: Peel the Eggs

Gently tap each egg on a hard surface to crack the shell.
Carefully peel under running water to remove the shell.
Ensure no shell pieces remain attached to the eggs.
Pat the eggs dry with a paper towel.
Step 3: Slice the Eggs

Slice each egg in half lengthwise using a sharp knife.
Wipe the knife between cuts for clean edges.
Gently remove the yolks and place them in a mixing bowl.
Set the egg whites aside on a serving platter.
Step 4: Prepare the Filling

Mash the egg yolks with a fork until smooth.
Add mayonnaise, mustard, vinegar, salt, and pepper to the yolks.
Mix until the ingredients are fully combined and creamy.
Fold in the chopped turkey breast gently.

All-in-One Piping Tips Set - Includes a reusable piping bag, 6 large piping tips, coupling, cleaning brush and storage container for easy decorating and efficient...
Step 5: Fill the Egg Whites

Transfer the yolk mixture into a piping bag or plastic bag.
Pipe the filling into each egg white half.
Ensure each half is generously filled and mounded.
Use a circular motion for a decorative finish.
Step 6: Garnish the Eggs
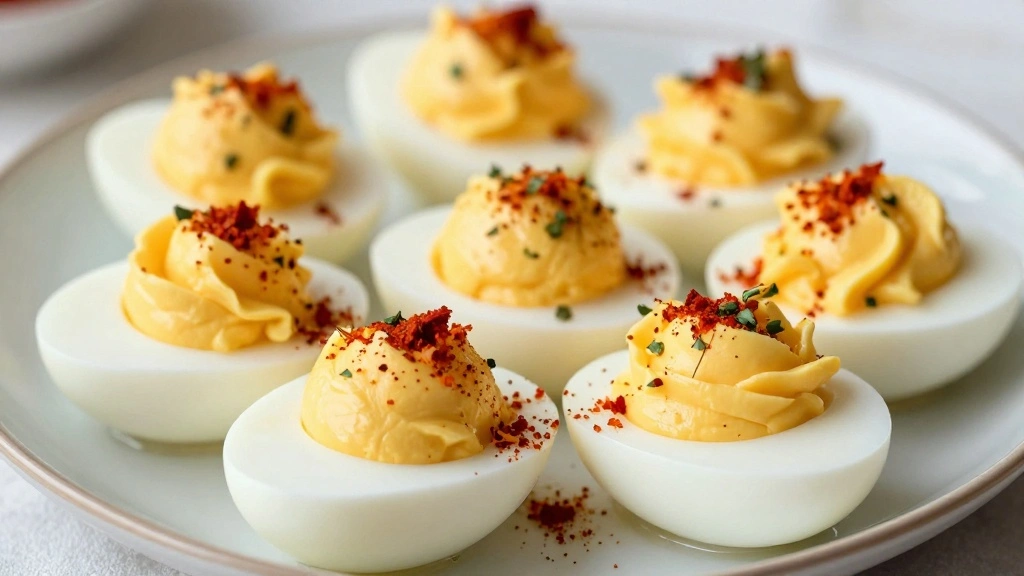
Sprinkle paprika over the filled eggs for color and flavor.
Optionally, add a sprig of fresh herb like dill or parsley.
Ensure garnish is evenly distributed across all eggs.
Consider additional toppings like a dash of hot sauce.
Step 7: Chill Before Serving
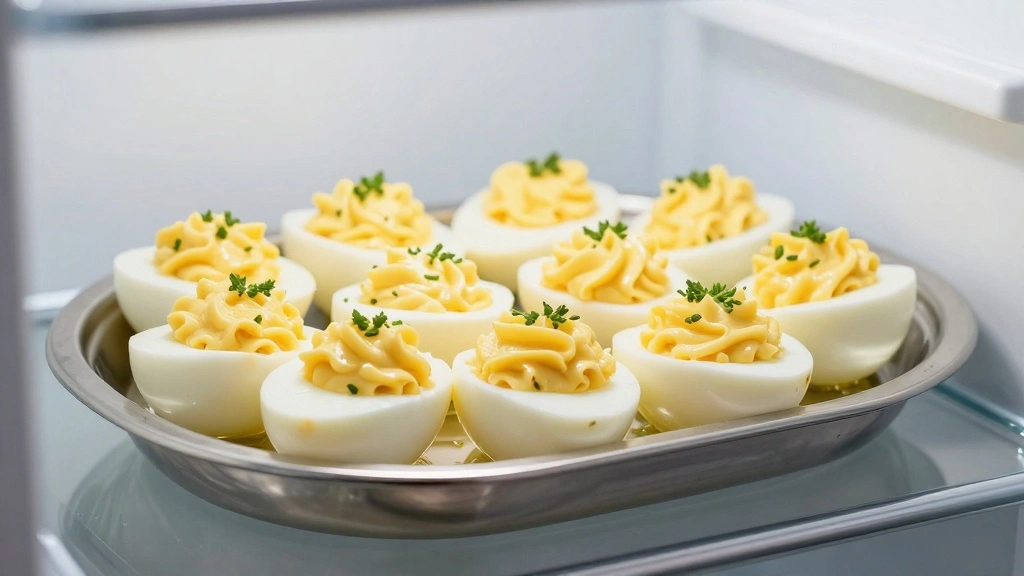
Cover the platter with plastic wrap to prevent drying.
Refrigerate for at least 30 minutes before serving.
Chilling helps the flavors meld and set the filling.
Check the eggs before serving to ensure they are cold.
Step 8: Serve and Enjoy
Remove the eggs from the refrigerator shortly before serving.
Arrange them on a serving tray if needed.
Serve as an appetizer or a protein-packed snack.
Enjoy the creamy texture and rich flavors.
Critical Timing and Temperature Guide
Egg Boiling: Boil eggs for exactly 10-12 minutes for hard yolks. Look for consistent boiling and avoid overcooking to prevent a green ring.
Chilling: Chill the eggs in an ice bath for at least 5 minutes to stop cooking and ensure easy peeling. A common mistake is inadequate chilling, causing difficult peeling.
Filling Preparation: Mix the filling immediately after yolks are mashed. Avoid letting yolks dry out, as this affects the texture.

Complete Decorating Kit - This deviled egg injector kit includes a syringe with 8 piping tips, letting you fill cupcakes, deviled eggs, pastries, and more with precision

Create stars, flowers, leaves and other designs with 4 decorating tips, a fill tip, and 2 couplers
MAKE PERFECT DEVILED EGGS: You will have all the tools you need to make delicious deviled eggs at home with this deviled egg kit! The Egg Rite Timer lets you know exactly when your eggs are done, the stainless steel masher effortlessly makes the filling, and the piping bag includes a tip to finish the dish!
Pro Tips for Turkey Deviled Eggs
• Ingredient Selection: Choose organic eggs and high-quality turkey breast for the best flavor and nutritional benefits.
• Preparation Secret: Adding a splash of vinegar to the boiling water helps prevent egg cracks and ensures easy peeling.
• Temperature Management: Use room-temperature mayonnaise to avoid curdling when mixing with the yolks.
• Texture Enhancement: For a smoother filling, pass the yolk mixture through a fine-mesh sieve before piping.
• Flavor Layering: Incorporate a hint of smoked paprika in the filling for a subtle smoky depth.
• Make-Ahead Strategies: Prepare the filling a day ahead and refrigerate separately from the egg whites.
• Restaurant-Quality Finishing Touches: Top with microgreens or a drizzle of truffle oil for an elevated presentation.
• Equipment Optimization: Ensure your piping bag is fitted with a star tip for professional-looking results.

【THICKENED 16 INCH PIPING BAGS】- Firstake large piping bag is made of thickened material, that is flexible, strong, reliable and thick enough to withstand pressure of squeezing and frosting without any burst or leakage, you can use it safely.

STAR TIP for PIPING:Great for piping cookie dough,pastry dough,mashed potatoes,meringues,makeing a great swirl on top of cupcakes or just a big dollop for decoration.

Material: high quality stainless steel.
Troubleshooting Common Issues
• Filling Too Runny: Excessive mayonnaise can cause runny filling. Reduce mayonnaise and balance with more yolk.
• Eggs Difficult to Peel: Fresh eggs are harder to peel. Use eggs that are at least a week old for easier peeling.
• Filling Lacks Flavor: Adjust seasoning by adding more mustard or vinegar for a sharper taste.
• Yolks Turn Green: Overcooking causes green yolks. Follow precise boiling times and use an ice bath.
• Egg Whites Tear: Use a gentle hand when removing yolks to prevent tearing whites.
Variations and Regional Differences
• Southern Style: Incorporates relish and a dash of hot sauce for added tang and spice.
• Asian Fusion: Uses wasabi and soy sauce in the filling for a unique umami flavor.
• Mediterranean: Includes olives and feta cheese for a savory Mediterranean twist.
• Mexican-Inspired: Adds avocado and lime juice for a creamy, zesty filling.
Food Science Behind the Recipe
• Emulsification: The combination of yolks and mayonnaise creates an emulsion, giving the filling its creamy texture.
• Protein Coagulation: Boiling transforms liquid egg whites into solid form, critical for the structure of deviled eggs.
• Flavor Compounds: The reaction between mustard and vinegar releases flavor compounds that enhance the dish.
Frequently Asked Questions
What's the most common mistake people make when preparing Turkey Deviled Eggs? Overcooking the eggs is a frequent misstep, leading to green yolks and rubbery whites. Precise timing is key.
Can these be made ahead of time? Yes, prepare the filling a day in advance and store it separately from the egg whites.
How can I make the filling smoother? Passing the yolk mixture through a fine-mesh sieve removes lumps and creates a smoother texture.
What can I use instead of turkey? Ham or smoked salmon are excellent alternatives that complement the flavors.
How do I prevent the eggs from rolling on the plate? Slice a small piece off the bottom of each egg white to create a flat surface.
What is the best way to store leftover deviled eggs? Store in an airtight container in the refrigerator for up to two days.
Can I use duck eggs instead? Yes, but adjust boiling time as duck eggs are larger and require more time to cook.
Serving and Presentation Guide
• Traditional Presentation: Serve on a bed of lettuce with paprika and fresh herbs for garnish.
• Modern Platter: Arrange on a slate board with edible flowers for a contemporary look.
• Appetizer Skewers: Place eggs on skewers with cherry tomatoes and olives for easy handling.
• Buffet Style: Use tiered stands to create an eye-catching display at larger gatherings.
Conclusion
Turkey Deviled Eggs offer a delightful twist on a classic favorite, combining rich flavors with high-protein goodness.
Their versatile nature makes them suitable for any occasion, while their easy preparation ensures success for cooks of all levels.
I encourage you to try this recipe and discover the joy of creating a dish that's both delicious and nourishing.
Share these tasty bites with family and friends, and watch them disappear from the table!