Deviled Eggs with Bacon bring a delightful twist to the classic appetizer, marrying rich, creamy yolks with salty, crispy bacon bits.
The flavor profile is a perfect balance of savory, tangy, and smoky, making it an irresistible treat for any occasion.
I first encountered this mouth-watering combination at a seasonal farmers’ market, where local chefs showcased their inventive takes on traditional dishes.
The addition of crispy bacon elevates the humble deviled egg into a gourmet delight that leaves a lasting impression.
Whether you’re hosting a brunch, a holiday gathering, or a casual picnic, these Deviled Eggs with Bacon are sure to be a crowd favorite.
With straightforward preparation, this recipe is both approachable and impressive, perfect for cooks of all skill levels.
The History and Cultural Significance
• Deviled Eggs trace their origins to ancient Rome, where they were initially prepared as a spiced egg dish for the elite.
• The dish evolved over decades, with the addition of mustard and mayonnaise in the modern era, becoming the beloved version we know today.
• In American culture, this dish traditionally appears at potlucks and holiday gatherings, symbolizing abundance and communal sharing.
• While many variations exist across different regions, the authentic version maintains a creamy yolk filling that’s both tangy and savory, setting it apart from imitations.
Recipe Overview
Nutritional Information (per serving)
Essential Equipment Guide
Pot: A medium-sized pot is crucial for boiling the eggs evenly. An alternative could be a large saucepan, but ensure it has enough space for water to circulate around the eggs.
Piping Bag: Using a piping bag helps achieve a neat and professional filling presentation. A plastic zip-top bag with a corner snipped off can serve as a makeshift alternative.
Skillet: A non-stick skillet is ideal for cooking the bacon to a perfect crispness without sticking. A cast-iron skillet can also work if you manage the heat carefully.
Ingredients
For the Eggs
|
| Amount | Ingredient | Notes |
|---|---|---|
| 6 large | eggs | hard-boiled |
| 1 teaspoon | white vinegar | helps peel eggs easily |
For the Filling
| Amount | Ingredient | Notes |
|---|---|---|
| 3 tablespoons | mayonnaise | adds creaminess |
| 1 teaspoon | Dijon mustard | adds tanginess |
| 1 tablespoon | white vinegar | provides acidity |
| 1 pinch | salt | enhances flavor |
For the Garnish
| Amount | Ingredient | Notes |
|---|---|---|
| 3 slices | bacon | cooked until crispy |
| 1 tablespoon | chives | finely chopped, adds freshness |
Preparation Methods
Boiling Eggs: Boil water in a pot and gently lower eggs in. Cook for exactly 10 minutes for a firm yet creamy yolk. Immediately transfer to an ice bath to halt cooking and make peeling easier.
Crisping Bacon: Cook bacon in a skillet over medium-high heat until fully crispy. Drain on paper towels to remove excess fat, maintaining the perfect crunch.
Piping Filling: Use a piping bag to fill egg whites with yolk mixture. This ensures a neat, consistent, and aesthetically pleasing presentation.
Step 1: Boil the Eggs

Place eggs in a single layer in a medium pot.
Cover with water and add a teaspoon of vinegar.
Bring to a boil over medium-high heat.
Once boiling, cover and let simmer for 10 minutes.
Step 2: Prepare the Ice Bath

Fill a large bowl with ice and cold water.
Once eggs have cooked, transfer them to the ice bath immediately.
Let them sit for at least 5 minutes.
This process stops the cooking and makes peeling easier.
Step 3: Cook the Bacon

Heat a skillet over medium-high heat.
Add bacon slices and cook until crispy, about 5 minutes per side.
Remove bacon and drain on paper towels.
Crispy bacon should be golden brown and slightly curled.
Step 4: Peel the Eggs

Gently tap the eggs on a hard surface to crack the shells.
Peel the eggs carefully under running water.
Ensure all shell fragments are removed.
Peeled eggs should be smooth and intact.
Step 5: Prepare the Filling

Cut peeled eggs in half lengthwise.
Remove yolks and place in a mixing bowl.
Add mayonnaise, mustard, vinegar, and salt to yolks.
Mash until smooth and well combined.
Step 6: Pipe the Filling

Spoon yolk mixture into a piping bag with a star tip.
Pipe mixture into egg whites, filling each cavity.
Ensure filling is piled high and attractively swirled.
The filling should be smooth and even in each egg half.
Step 7: Chop the Bacon

Crumble or roughly chop the cooled, crispy bacon.
Ensure pieces are small enough to sprinkle over eggs.
Bacon should be evenly crispy and dry.
Prepared bacon bits should be ready for garnishing.
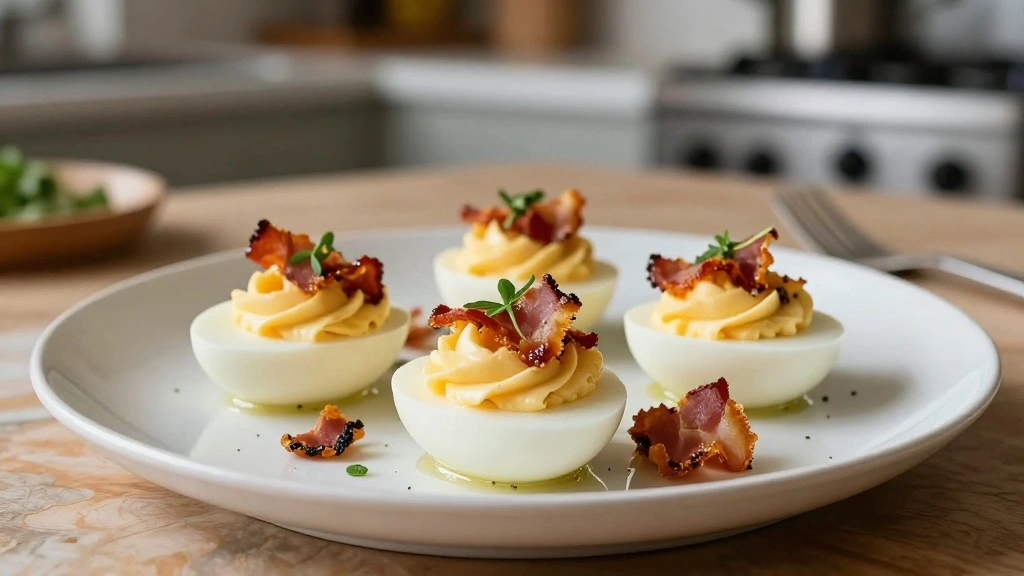
Step 8: Garnish and Serve

Sprinkle chopped bacon over the filled eggs.
Add a pinch of chopped chives for color and flavor.
Arrange eggs on a serving platter.
Garnished eggs should look vibrant and inviting.
Critical Timing and Temperature Guide
Boiling Eggs: Boil for exactly 10 minutes. Overcooking can result in a rubbery texture and a greenish yolk.
Bacon Crisping: Cook on medium-high heat until evenly golden brown. Avoid burning by turning frequently.
Cooling Eggs: Immerse in an ice bath for at least 5 minutes. This stops cooking and ensures easy peeling.
Pro Tips for Deviled Eggs with Bacon
• Ingredient Selection: Choose fresh, large eggs and high-quality bacon for the best flavor and texture. Organic options are recommended for superior taste.
• Preparation Secret: Adding vinegar to the boiling water helps eggs peel more easily by softening the shells.
• Temperature Management: Ensure eggs are completely cold before peeling to prevent sticking.
• Texture Enhancement: Mashing yolks until completely smooth ensures a creamy filling without lumps.
• Flavor Layering: Balancing mustard, vinegar, and bacon creates a complex yet harmonious flavor profile.
• Make-Ahead Strategies: Prepare components in advance and store separately. Assemble just before serving to maintain freshness.
• Restaurant-Quality Finishing Touches: Use a piping bag for a professional presentation and garnish with fresh herbs.
• Equipment Optimization: A non-stick skillet ensures bacon cooks evenly without sticking, maintaining crispness.
Troubleshooting Common Issues
• Filling Too Runny: This often occurs if too much mayonnaise is added. Adjust by incorporating more mashed yolks.
• Eggs Difficult to Peel: If the eggs are too fresh or not cold enough, they can be difficult to peel. Ensure to cool thoroughly in an ice bath.
• Bacon Not Crispy: If bacon is not cooked at the right temperature, it won't crisp properly. Maintain consistent heat and drain excess fat.
• Filling Lacks Flavor: Under-seasoning can lead to bland filling. Ensure to taste and adjust seasoning before piping.
• Garnish Falling Off: If garnishes are added too early, they may fall off. Add just before serving for maximum adherence.
• Egg Whites Tearing: Handle gently when removing yolks and filling to avoid tearing the egg whites.
Variations and Regional Differences
• Southern Style: Includes the addition of pickle relish and sometimes a dash of hot sauce for a tangy, spicy kick.
• French Variation: Often incorporates herbs de Provence and crème fraîche for a refined, aromatic flavor.
• Asian Fusion: May include wasabi or soy sauce in the filling, topped with sesame seeds for a unique twist.
• Tex-Mex Style: Features jalapeños and cilantro in the filling, with a hint of lime juice for a zesty flavor.
Food Science Behind the Recipe
• Emulsification: The combination of egg yolks and mayonnaise creates a stable emulsion, resulting in a creamy, homogeneous filling.
• Protein Denaturation: Boiling eggs causes the proteins to denature and solidify, creating the firm texture necessary for deviled eggs.
• Browning Reaction: The Maillard reaction during bacon cooking results in the development of complex flavors and crispy texture.
Frequently Asked Questions
What's the most common mistake people make when preparing Deviled Eggs with Bacon? Overcooking the eggs, leading to rubbery whites and greenish yolks. Ensure to follow the boiling time precisely.
Can I make Deviled Eggs in advance? Yes, you can prepare the components a day ahead, but assemble them just before serving to maintain freshness.
How do I ensure my filling is smooth? Thoroughly mash the yolks and whisk the filling to eliminate lumps for a smooth consistency.
Is there a substitute for mayonnaise? Greek yogurt can be used as a healthier alternative, though it may alter the taste slightly.
How do I store leftover Deviled Eggs? Keep them in an airtight container in the refrigerator for up to 2 days.
What's the best way to transport Deviled Eggs? Use a deviled egg carrier or a container with a tight-fitting lid to prevent movement.
How can I make my Deviled Eggs more visually appealing? Use a piping bag for neat filling and garnish with fresh herbs or paprika for color.
Serving and Presentation Guide
• Traditional Presentation: Serve on a platter, garnished with a modest sprinkle of paprika and fresh chives for a classic look.
• Modern Approach: Arrange on a slate board with microgreens for a contemporary touch.
• Individual Servings: Present in small, individual cups for a personalized serving approach.
• Themed Presentation: Use decorative serving trays that match the theme of your event, like floral for spring gatherings.
Conclusion
With their delightful combination of creamy yolk filling and crispy bacon, Deviled Eggs with Bacon are sure to satisfy any crowd.
This recipe offers a straightforward approach to creating a gourmet appetizer that is both visually appealing and delicious.
I encourage you to try this recipe and enjoy the perfect blend of flavors and textures it offers.
Share this treat with friends and family, and watch it become a staple at your gatherings.