Deviled eggs are a timeless classic that bring a touch of elegance to any gathering.
Their creamy, tangy filling is perfectly balanced by a hint of spice that keeps you coming back for more.
I have fond memories of deviled eggs at family picnics, where they were always the first dish to disappear.
This recipe captures the essence of those cherished moments, refined over time to achieve the perfect balance of flavors.
Whether you’re hosting a holiday brunch or a summer barbecue, these deviled eggs are sure to impress your guests.
Get ready to discover the secrets to making the best deviled eggs you’ve ever tasted.
The History and Cultural Significance
• The Best Deviled traces its origins to ancient Rome, where it was originally created by chefs who stuffed seasoned eggs with a variety of spices and herbs.
• The dish evolved over decades as cooking techniques improved, eventually becoming the beloved version we know today during the 19th century in Europe.
• In Southern American culture, this dish traditionally appears at Easter celebrations and family gatherings, symbolizing renewal and abundance.
• While many variations exist across different regions, the authentic version maintains a creamy filling with a touch of mustard that sets it apart from imitations.
Recipe Overview
Nutritional Information (per serving)
Essential Equipment Guide
Egg Cooker: An egg cooker ensures perfectly cooked eggs every time, which is essential for achieving the right texture in deviled eggs. Alternatives include boiling in a saucepan, but be mindful of timing to avoid overcooking.
Piping Bag: Using a piping bag allows for a neat and attractive presentation of the filling. If you don’t have one, a plastic sandwich bag with a corner cut off can suffice.
Mixing Bowl: A mixing bowl is crucial for thoroughly blending the filling ingredients. Choose one with a non-slip base to make the mixing process easier.
Ingredients
For the Base
|
| Amount | Ingredient | Notes |
|---|---|---|
| 12 large | eggs | hard-boiled, peeled |
For the Filling
| Amount | Ingredient | Notes |
|---|---|---|
| 1/2 cup | mayonnaise | adds creaminess |
| 1 tablespoon | Dijon mustard | for tangy flavor |
| 1 teaspoon | white vinegar | enhances the tang |
| 1/4 teaspoon | salt | to taste |
| 1/4 teaspoon | black pepper | freshly ground |
| 1/4 teaspoon | paprika | for garnish |
Preparation Methods
Perfectly Boiled Eggs: Start with cold water and bring to a gentle boil, then reduce to a simmer for 10 minutes. This method prevents overcooking, resulting in eggs with bright, creamy yolks.
Filling Consistency: Blend the yolk filling until smooth using a fork or a hand mixer. A smooth filling ensures a creamy texture that contrasts beautifully with the firm egg white.
Garnishing with Paprika: Lightly dust the filled eggs with paprika for color and a subtle smoky flavor. Use a fine mesh sieve for an even distribution.
Step 1: Prepare Ingredients

Gather all ingredients and equipment needed for the recipe.
Ensure eggs are hard-boiled and peeled before starting.
Measure out all filling ingredients for accurate proportions.
Set up a clean workspace to facilitate easy preparation.
Step 2: Boil the Eggs

Place eggs in a single layer in a saucepan and cover with cold water.
Bring to a gentle boil over medium heat, then reduce to a simmer.
Simmer eggs for exactly 10 minutes for perfectly cooked yolks.
Transfer eggs to an ice bath to stop cooking and cool completely.
Step 3: Peel the Eggs

Carefully crack the cooled eggshells all over.
Roll the eggs gently under your hand to loosen the shell.
Peel the eggs starting from the wider end to avoid tearing the whites.
Rinse peeled eggs under cold water to remove any shell fragments.
Step 4: Prepare the Yolk Filling

Cut each egg in half lengthwise and remove the yolks.
Place yolks in a mixing bowl and set whites aside on a serving plate.
Add mayonnaise, mustard, vinegar, salt, and pepper to the yolks.
Mash and mix until smooth and creamy, with no lumps remaining.
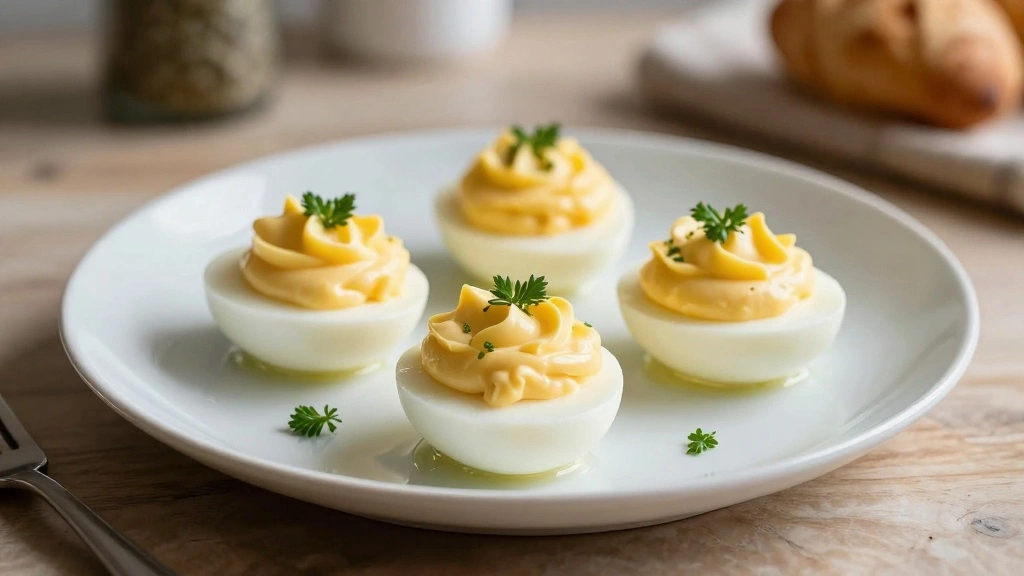
Step 5: Fill the Egg Whites

Transfer the yolk mixture to a piping bag fitted with a star tip.
Pipe the filling into the cavity of each egg white half.
Ensure the filling is evenly distributed among all egg halves.
Smooth the top if needed for a neat presentation.
Step 6: Garnish with Paprika

Lightly dust the filled eggs with paprika using a fine mesh sieve.
Hold the sieve a few inches above the eggs for even coverage.
Adjust the amount of paprika to your taste preference.
Garnish adds visual appeal and a hint of smoky flavor.
Step 7: Chill Before Serving
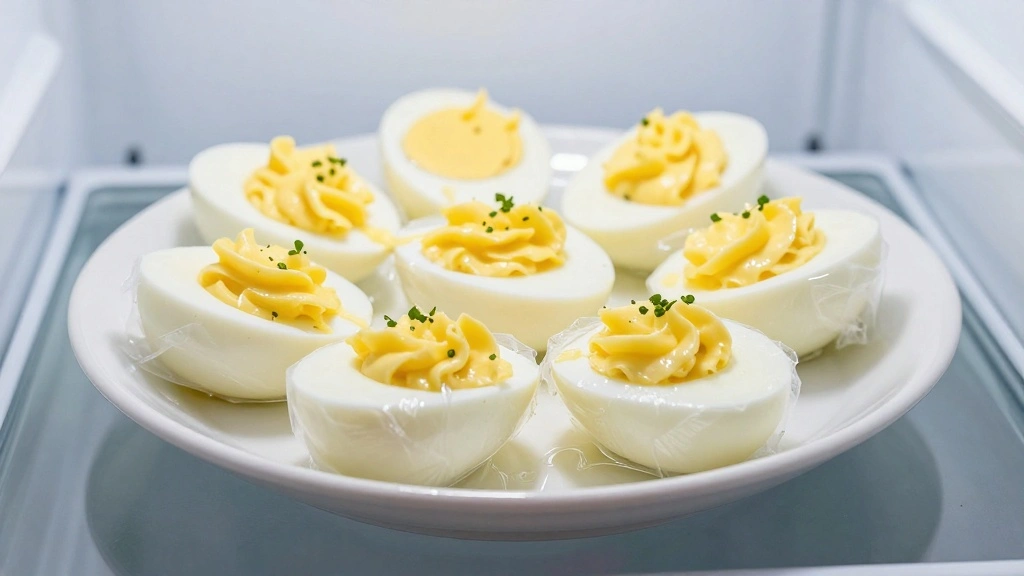
Cover the plate of deviled eggs with plastic wrap.
Refrigerate for at least 1 hour to let flavors meld.
Chilled eggs have a firmer texture and more balanced taste.
Serve immediately after chilling for optimal freshness.
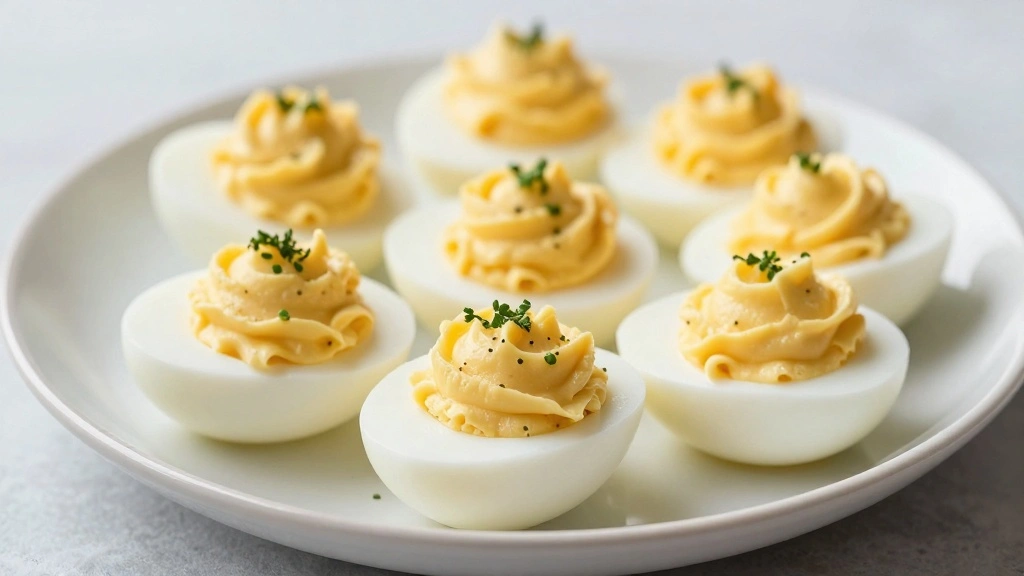
Step 8: Serve and Enjoy

Remove chilled deviled eggs from the refrigerator.
Arrange them neatly on a serving platter.
Optionally garnish with fresh herbs like dill or chives.
Serve as an appetizer or side dish at your gathering.
Critical Timing and Temperature Guide
Boiling Eggs: Simmer eggs for exactly 10 minutes. Yolks should be fully cooked but not overdone, with a bright yellow color. Avoid overcooking to prevent green rings around the yolks.
Chilling the Eggs: Chill peeled eggs in an ice bath for 5 minutes to stop cooking and ensure easy peeling. The ice bath prevents the yolks from overcooking.
Refrigerating Before Serving: Chill filled eggs for at least 1 hour. This allows flavors to meld and ensures the filling sets properly. Avoid serving immediately as the flavors may not be fully developed.
Pro Tips for The Best Deviled Eggs
• Ingredient Selection: Choose high-quality, fresh eggs and premium mayonnaise for the best flavor and texture.
• Preparation Secret: Gently roll boiled eggs on the counter to crack the shell evenly for easy peeling.
• Temperature Management: Use room temperature ingredients for the filling to ensure smooth blending and optimal flavor release.
• Texture Enhancement: Blend yolks until completely smooth to avoid any gritty texture in the filling.
• Flavor Layering: Use a touch of vinegar in the filling to balance richness with acidity, adding complexity to the taste.
• Make-Ahead Strategies: Prepare eggs and filling a day in advance and store separately. Assemble just before serving.
• Restaurant-Quality Finishing Touches: Use a piping bag with a decorative tip for a professional presentation.
• Equipment Optimization: If using a saucepan to boil eggs, use a timer to avoid overcooking.
Troubleshooting Common Issues
• Texture Too Dense: Overcooked yolks can lead to a dense filling. Ensure eggs are cooked for the correct time and yolks are mashed thoroughly.
• Flavors Unbalanced: If the filling tastes too bland, adjust seasoning and add a bit more mustard or vinegar for more zing.
• Soggy Egg Whites: Ensure eggs are not overboiled and are well-chilled before filling to prevent excess moisture.
• Filling Separation: If the filling appears oily, whisk in a bit more mayonnaise to emulsify the mixture.
• Inconsistent Filling Distribution: Use a piping bag for even filling distribution and a neat presentation.
• Shells Hard to Peel: Use slightly older eggs, as they peel more easily than fresh eggs.
Variations and Regional Differences
• Southern Style: Features the addition of pickle relish and hot sauce for extra tang and heat, reflecting Southern culinary traditions.
• French Variation: Includes herbs de Provence and a touch of crème fraîche, offering a refined and aromatic twist.
• Spicy Mexican: Adds diced jalapeños and cumin to create a bold, spicy flavor profile with a nod to Mexican cuisine.
• Mediterranean Influence: Incorporates olives and feta cheese into the filling, providing a rich, savory taste with Mediterranean flair.
Food Science Behind the Recipe
• Emulsification: Mayonnaise acts as an emulsifier, binding the filling ingredients together for a smooth, creamy texture.
• Protein Coagulation: Properly cooking the eggs ensures proteins are coagulated without overcooking, resulting in tender whites and creamy yolks.
• Flavor Balance: Acids like vinegar enhance flavors by balancing the richness of the yolks and mayonnaise, creating a harmonious taste.
Frequently Asked Questions
What's the most common mistake people make when preparing deviled eggs? Overcooking the eggs is the most common mistake, leading to rubbery whites and a green ring around the yolk.
Can I use different types of mustard in the filling? Absolutely! Dijon mustard is classic, but whole-grain or spicy mustard can add a unique twist.
How can I make deviled eggs ahead of time? Prepare components separately and assemble just before serving to maintain freshness.
Why are my egg whites soggy? Ensure eggs are cooled and dried before filling to prevent excess moisture.
Is it possible to make deviled eggs without mayonnaise? Yes, Greek yogurt or avocado can be used as healthier alternatives.
How should I store leftover deviled eggs? Store in an airtight container in the refrigerator for up to two days for best quality.
Can I adjust the level of spiciness in the filling? Yes, adjust the amount of paprika or add a dash of hot sauce to taste.
Serving and Presentation Guide
• Traditional Presentation: Serve on a classic egg platter with slots for each egg, garnished with fresh herbs for a timeless look.
• Modern Minimalist: Arrange on a sleek, rectangular platter with microgreens for a contemporary touch.
• Rustic Style: Use a wooden board and add edible flowers for a rustic, natural presentation.
• Festive Display: Add colorful garnishes like diced bell peppers or chives for a vibrant, festive appearance.
Conclusion
With these detailed instructions and tips, you're well-equipped to make the best deviled eggs ever.
Whether you're a seasoned cook or a beginner, this recipe promises impressive results that will wow your guests.
Give these deviled eggs a try and experience the perfect balance of flavors and textures for yourself.
Happy cooking and enjoy every delicious bite!